REST APIによる操作#
Terminal System 2 v1.0.0
Terminal SystemのREST APIをコールして設定や操作を行う例を以下に挙げます。
重要
本章には主な操作の例を掲載しています。 REST APIの仕様の詳細については API仕様 を参照してください。
準備#
エッジコンピューターと設定用PCがLANにより疎通可能なネットワーク環境を整えます。 通常は、設定用PCとエッジコンピューターをLANケーブルで直接接続するか、エッジコンピューターと設定用PCを同じローカルネットワークに接続します。
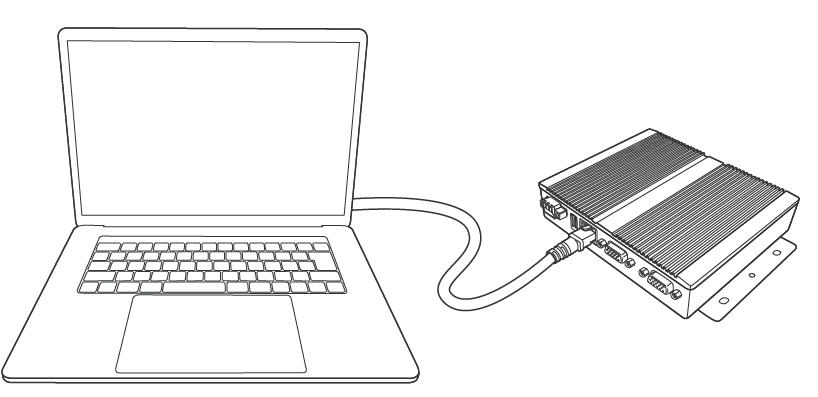
図 167 設定用PCエッジコンピューターを接続する#
注釈
上の図ではエッジコンピューターと設定用PCを直接接続していますが、エッジコンピューターと設定用PCが同じローカルネットワークに接続されていれば構いません。
エッジコンピューターの電源をオンにします。
以下の例では、userというユーザーのパスワード( プロビジョニング で設定したパスワード) 、コンピューター名(初期設定では terminal-system )が環境変数として設定されているものとします。
export USER_PASS=<プロビジョニングで設定したパスワード>
export COMPUTER_NAME=terminal-system
export API_FQDN=$COMPUTER_NAME.local:8081
注意
IP許可リスト を設定している場合は、リストに含まれるアドレスからのリクエストしか許可されません。
IP許可リストがIPv4のアドレスで設定されている場合は、curlコマンドのオプションに --ipv4 を指定して、IPv4を使ってリクエストしてください。
LAN/モバイル回線の設定#
以下は、モデムタイプのデバイスの設定を作成する例です。
ネットワークデバイスの device_name を確認#
まず、ネットワークデバイスのリストを取得します。
$ curl -sS -w '%{http_code}\n' -u user:$USER_PASS -X GET http://$API_FQDN/api/network_devices
[
  {
    "device_name": "eth0",
    "device_type": "ethernet",
    "nic_name": "eth0",
    "ip_address": "192.168.11.8",
    "subnet_mask": "255.255.255.0",
    "gateway": "192.168.11.1",
    "dns_servers": [
      "192.168.11.1"
    ]
  },
  {
    "device_name": "cdc-wdm0",
    "device_type": "modem"
  },
  {
     "device_name": "wlan0",
     "device_type": "wifi"
  }
]
ここでは、以下のネットワークデバイスが利用可能であることが分かりました。
Ethernetデバイス
eth0モバイル回線デバイス
cdc-wdm0WiFiデバイス
wlan0
ネットワーク接続の作成#
ネットワークデバイス cdc-wdm0 を使用するモバイル回線のネットワーク設定を作成するには、以下のようにします。
$ curl -sS -w '%{http_code}\n' -u user:$USER_PASS -X POST -d '
{
  "device_name": "cdc-wdm0",
  "display_name": "LTE",
  "enabled": true,
  "connection_type": "gsm",
  "gsm_settings": {
    "mtu": 0,
    "apn": "apn.example.jp",
    "username": "",
    "password": "",
    "band_preset": "MA251.A.BI.001"
  }
}
' http://$API_FQDN/api/network_connections
ネットワークデバイス wlan0 を使用する無線LAN(クライアントモード)のネットワーク設定を作成するには、以下のようにします。
$ curl -sS -w '%{http_code}\n' -u user:$USER_PASS -X POST -d '
{
  "device_name": "wlan0",
  "display_name": "wifi",
  "enabled": true,
  "connection_type": "wireless",
  "wireless_settings": {
    "mtu": 0,
    "ssid": "SSID",
    "psk": "password"
  }
}
' http://$API_FQDN/api/network_connections
接続先intdashサーバーと認証の設定#
$ curl -sS -w '%{http_code}\n' -u user:$USER_PASS -X PATCH -d '
{
  "server_url": "https://example.intdash.jp",
  "project_uuid": "00000000-0000-0000-0000-000000000000",
  "edge_uuid": "f90f2b42-66a5-4a57-8e99-468c36ebb6f2",
  "client_secret": "sEh9ZHPoKX8QYU...iBn5fneFM"
}' http://$API_FQDN/api/agent/connection
トランスポート設定#
$ curl -sS -w '%{http_code}\n' -u user:$USER_PASS -X PATCH -d '
{
  "protocol": "websocket"
}' http://$API_FQDN/api/agent/transport
データ送受信#
データ送信の設定(アップストリーム)#
この例では、以下の3つの設定を行います。
アップストリーム
デバイスコネクターIPC
デバイスコネクター
これにより、以下のようにデータが流れるようにします。
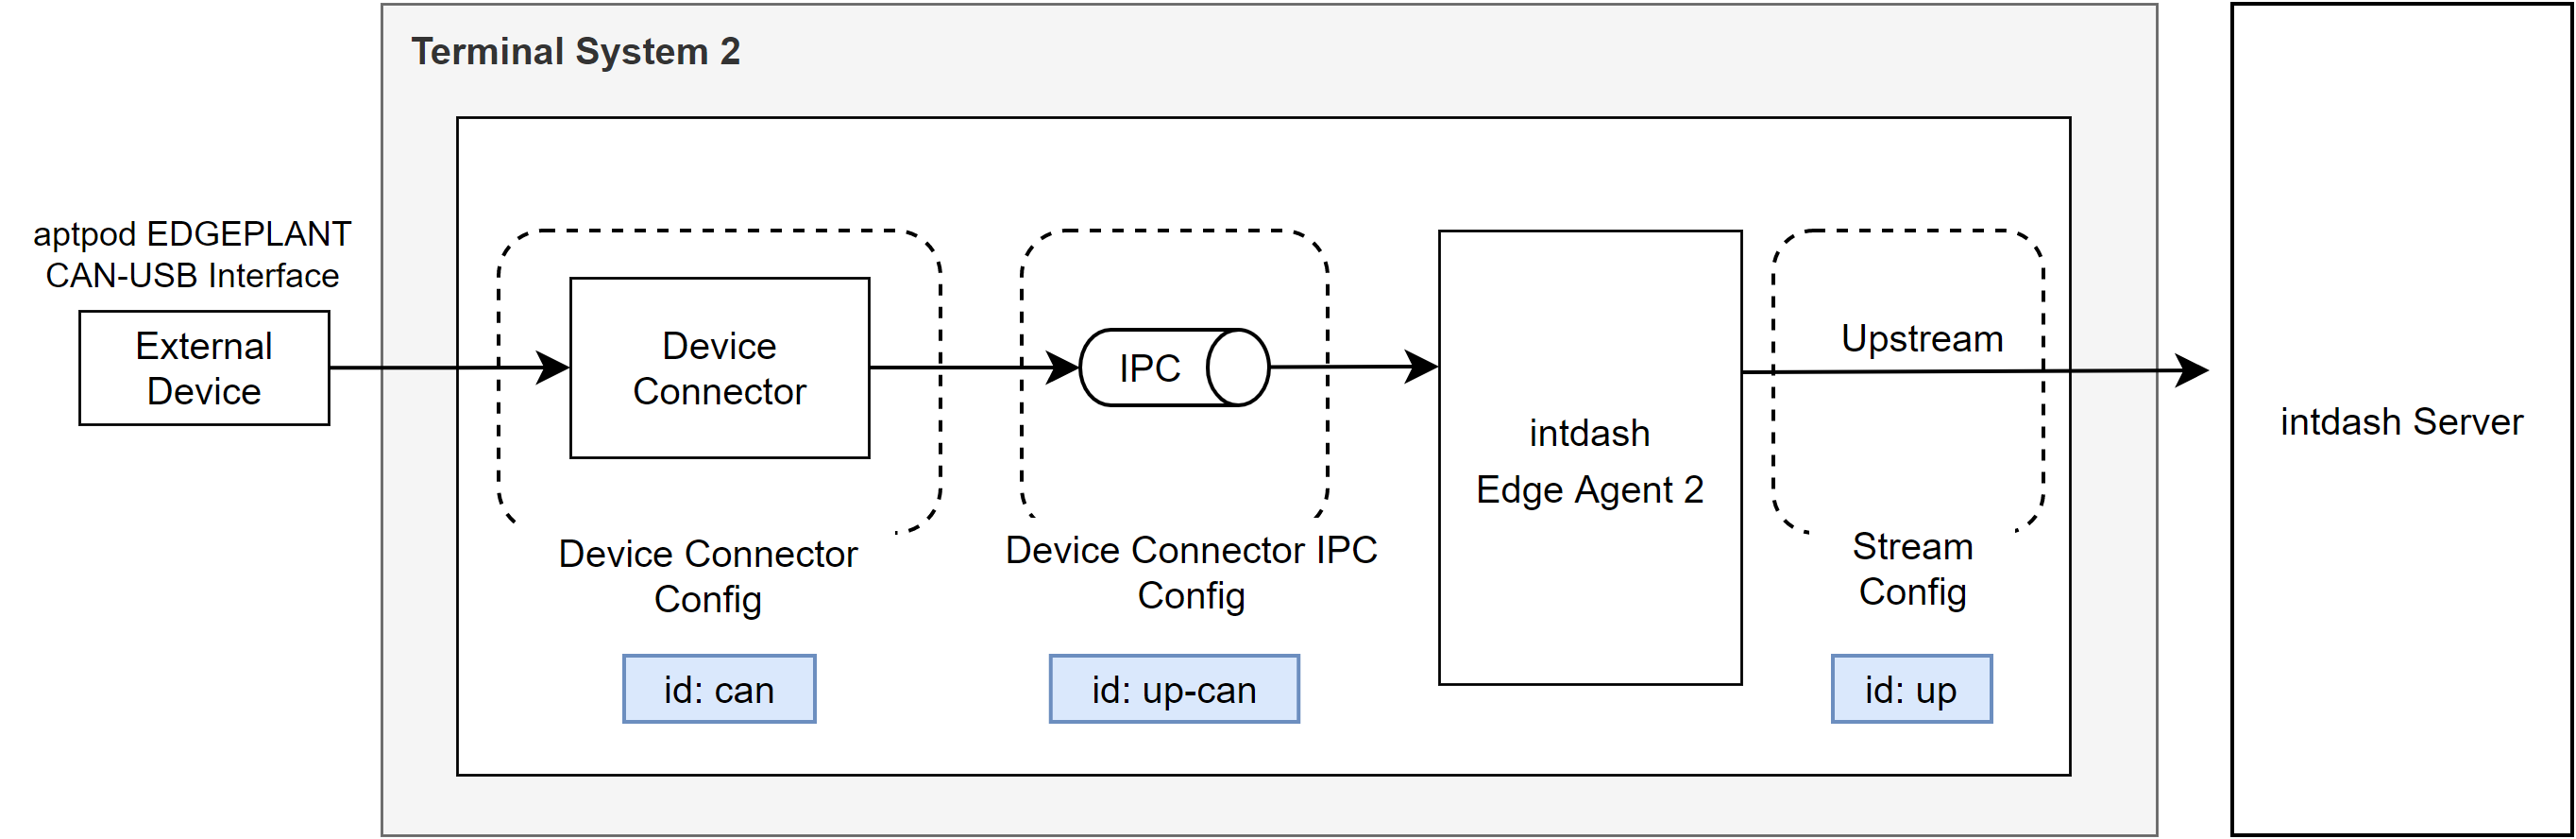
図 168 デバイスコネクターからアップストリームまでの設定例#
ストリーム(アップストリーム)作成#
$ curl -sS -w '%{http_code}\n' -u user:$USER_PASS -X POST -d '
  {
    "id": "default-upstream"
  }
' http://$API_FQDN/api/agent/upstreams
アップストリーム用のデバイスコネクターIPCを作成#
$ curl -sS -w '%{http_code}\n' -u user:$USER_PASS -X POST -d '
{
  "id": "camera",
  "data_name_prefix": "v1/101/",
  "dest_ids": [
    "default-upstream"
  ],
  "format": "iscp-v2-compat"
}' http://$API_FQDN/api/agent/device_connectors_upstream
デバイスコネクター設定を作成#
$ curl -sS -w '%{http_code}\n' -u user:$USER_PASS -X POST -d '
{
  "id": "camera",
  "upstream_ipc_ids": [
    "camera"
  ],
  "downstream_ipc_ids": [],
  "service_id": "H.264 for EDGEPLANT USB Camera",
  "service_substitutions": [
    "DC_DEVICE_PATH=/dev/video0"
  ]
}' http://$API_FQDN/api/device_connectors
警告
設定を反映して計測を行うには 計測の設定を決定する が必要です。
データ受信の設定(ダウンストリーム)#
この例では、以下の3つの設定を行います。
デバイスコネクターIPC
ダウンストリーム
デバイスコネクター
これにより、以下のようにデータが流れるようにします。
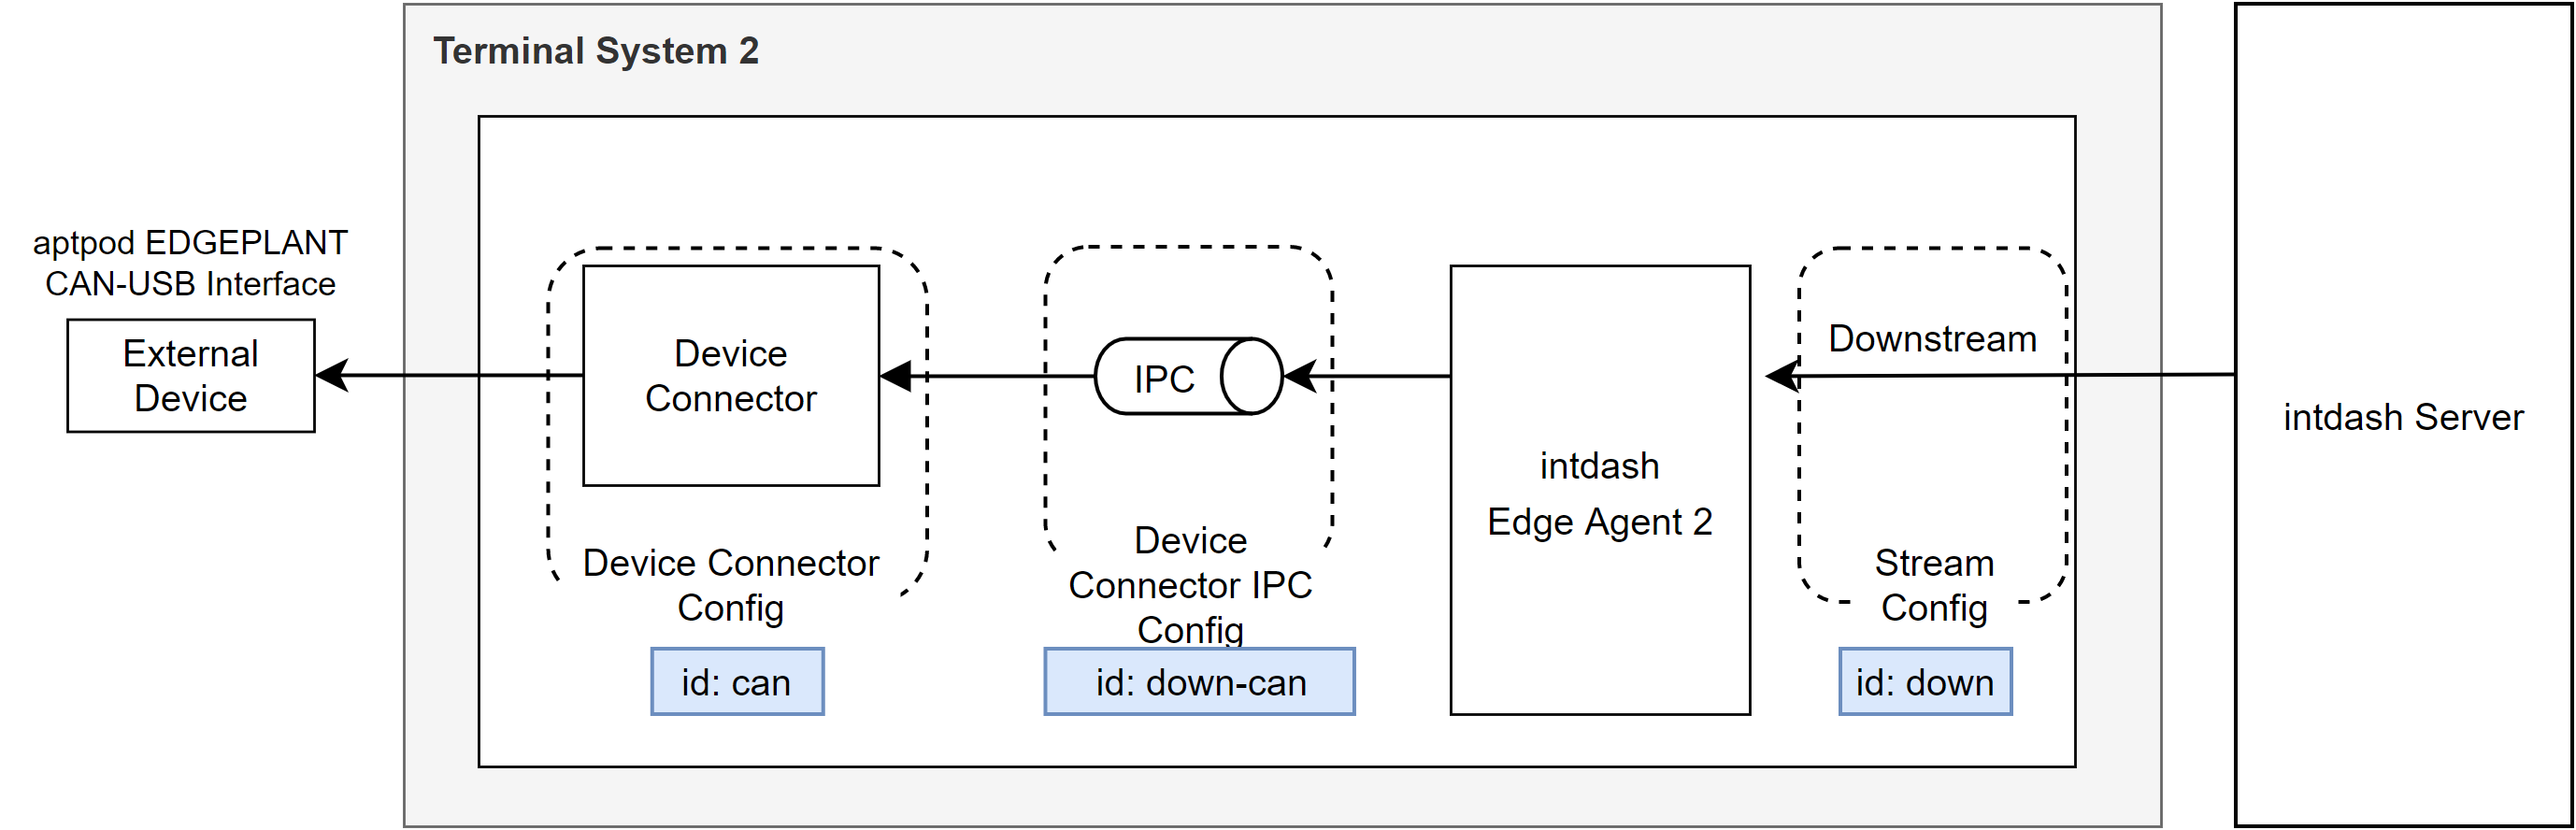
図 169 ダウンストリームからデバイスコネクターまでの設定例#
ダウンストリーム用のデバイスコネクターIPCを作成#
$ curl -sS -w '%{http_code}\n' -u user:$USER_PASS -X POST -d '
{
  "id": "can",
  "enabled": true,
  "format": "iscp-v2-compat"
}' http://$API_FQDN/api/agent/device_connectors_downstream
ダウンストリーム設定を作成#
$ curl -sS -w '%{http_code}\n' -u user:$USER_PASS -X POST -d '
{
  "id": "can-downstream",
  "dest_ids": [
    "can"
  ],
  "filters": [
    {
      "src_edge_uuid": "568ff243-d200-43c4-9942-473c08ccfac1",
      "data_filters": [
        {
          "type": "can_frame",
          "name": "v1/1/00000001"
        }
      ]
    }
  ]
}' http://$API_FQDN/api/agent/downstreams
デバイスコネクター設定を作成#
$ curl -sS -w '%{http_code}\n' -u user:$USER_PASS -X POST -d '
{
   "id": "can",
   "upstream_ipc_ids": [],
   "downstream_ipc_ids": [
      "can"
   ],
   "service_id": "CAN-USB Interface (Downstream)",
   "service_substitutions": [
      "DC_DEVICE_PATH=/dev/apt-usb/by-id/usb-aptpod__Inc._EP1-CH02A_00000.EXAMPLE-if00",
      "DC_LISTENONLY=0"
   ]
}' http://$API_FQDN/api/device_connectors
警告
設定を反映して計測を行うには 計測の設定を決定する が必要です。
フィルター#
アップストリーム方向のフィルターを作成#
この例では、行先のストリームとして default-upstream が指定されているstring型のデータポイントについて、行先をdeferredに変更します。
$ curl -sS -w '%{http_code}\n' -u user:$USER_PASS -X POST -d '
{
  "id": "string_to_deferred",
  "enabled": true,
  "type": "type",
  "target": {
    "dest_ids": [
      "default-upstream"
    ],
    "type": "string"
  },
  "change_to": {
    "dest_id": "deferred"
  }
}' http://$API_FQDN/api/agent/filters_upstream
ダウンストリーム方向のフィルターを作成#
この例では、行先のダウンストリームIPCとして dc1 が指定されているstring型のデータポイントについて、行先をdc2に変更します。
$ curl -sS -w '%{http_code}\n' -u user:$USER_PASS -X POST -d '
{
  "id": "string_to_dc2",
  "enabled": true,
  "type": "type",
  "target": {
    "dest_ids": [
      "dc1"
    ],
    "type": "string"
  },
  "change_to": {
    "dest_id": "dc2"
  }
}' http://$API_FQDN/api/agent/filters_downstream
計測の開始/終了#
計測の設定を決定する#
デバイスコネクター設定を変更した場合には、以下のAPIコールを行い、設定を決定する必要があります。
$ curl -sS -w '%{http_code}\n' -u user:$USER_PASS -X POST http://$API_FQDN/api/device_connectors/-/commit
計測を開始する#
$ curl -sS -w '%{http_code}\n' -u user:$USER_PASS -X POST http://$API_FQDN/api/docker/composes/measurement/start
計測を停止する#
$ curl -sS -w '%{http_code}\n' -u user:$USER_PASS -X POST http://$API_FQDN/api/docker/composes/measurement/stop
ローカル計測データの管理#
ローカルに保存された計測の確認#
$ curl -sS -w '%{http_code}\n' -u user:$USER_PASS -X GET http://$API_FQDN/api/agent/measurements
ローカルに保存された計測の削除#
$ curl -sS -w '%{http_code}\n' -u user:$USER_PASS -X DELETE http://$API_FQDN/api/agent/measurements/7f66d514-b6bc-4c64-bcc6-6041d9864efb
Terminal Systemの状態を確認する#
intdash Edge Agent 2 のインベントリー#
Agentとintdashサーバー間の接続設定のステータス#
$ curl -sS -w '%{http_code}\n' -u user:$USER_PASS -X GET http://$API_FQDN/api/agent/connection/state
アップストリームのステータス#
$ curl -sS -w '%{http_code}\n' -u user:$USER_PASS -X GET http://$API_FQDN/api/agent/upstreams/-/state
ダウンストリームのステータス#
$ curl -sS -w '%{http_code}\n' -u user:$USER_PASS -X GET http://$API_FQDN/api/agent/downstreams/-/state
遅延アップロードのステータス#
$ curl -sS -w '%{http_code}\n' -u user:$USER_PASS -X GET http://$API_FQDN/api/agent/deferred_upload/state
デバイスコネクター(アップストリーム)のステータス#
$ curl -sS -w '%{http_code}\n' -u user:$USER_PASS -X GET http://$API_FQDN/api/agent/device_connectors_upstream/-/state
デバイスコネクター(ダウンストリーム)のステータス#
$ curl -sS -w '%{http_code}\n' -u user:$USER_PASS -X GET http://$API_FQDN/api/agent/device_connectors_downstream/-/state
計測のリスト#
$ curl -sS -w '%{http_code}\n' -u user:$USER_PASS -X GET http://$API_FQDN/api/agent/measurements
Terminal Systemのインベントリー#
デバイスコネクターサービスのリスト#
$ curl -sS -w '%{http_code}\n' -u user:$USER_PASS -X GET http://$API_FQDN/api/device_connector_services
GSM用周波数バンド設定のリスト#
$ curl -sS -w '%{http_code}\n' -u user:$USER_PASS -X GET http://$API_FQDN/api/gsm_band_presets
ネットワークデバイスのリスト#
$ curl -sS -w '%{http_code}\n' -u user:$USER_PASS -X GET http://$API_FQDN/api/network_devices
Terminal Systemの情報#
$ curl -sS -w '%{http_code}\n' -u user:$USER_PASS -X GET http://$API_FQDN/api/terminal_system
Docker のインベントリー#
Dockerコンテナ情報#
$ curl -sS -w '%{http_code}\n' -u user:$USER_PASS -X GET http://$API_FQDN/api/docker/containers
Dockerイメージ情報#
$ curl -sS -w '%{http_code}\n' -u user:$USER_PASS -X GET http://$API_FQDN/api/docker/images
アップデート(周辺機器含む)#
ソフトウェアの提供元から、アップデート用のアーティファクト(拡張子が
.menderのファイル)を入手します。アーティファクトを指定して、Terminal Systemを更新します
例: アーティファクト
/tmp/terminal-system-image-edgeplant_t1-1234.menderを利用してTerminal Systemを更新する$ curl -sS -w '%{http_code}\n' -u user:$USER_PASS -X POST -F file=@/tmp/terminal-system-image-edgeplant_t1-1234.mender http://$API_FQDN/api/terminal_system/upgrade_with_file
コンピューター名を変更する#
$ curl -sS -w '%{http_code}\n' -u user:$USER_PASS -X PATCH -d '
{
  "computer_name": "new-name"
}' http://$API_FQDN/api/terminal_system/identification
遅延アップロードの設定を変更する#
$ curl -sS -w '%{http_code}\n' -u user:$USER_PASS -X PATCH -d '
{
  "priority": "same_as_realtime",
  "limit_data_storage": true,
  "data_storage_capacity": 102400
}' http://$API_FQDN/api/agent/deferred_upload
電源をオンにしたら自動的に計測が開始されるようにする#
設定を有効にする
$ curl -sS -w '%{http_code}\n' -u user:$USER_PASS -X PATCH -d '
{
  "boot_after": "system"
}' http://$API_FQDN/api/docker/composes/measurement
設定を無効にする
$ curl -sS -w '%{http_code}\n' -u user:$USER_PASS -X PATCH -d '
{
  "boot_after": ""
}' http://$API_FQDN/api/docker/composes/measurement
Basic認証のパスワードを変更する#
$ curl -sS -w '%{http_code}\n' -u user:$USER_PASS -X PATCH -d '
{
   "password": "p@ssword"
}' http://$API_FQDN/api/api_users/user
IP許可リストを設定する#
$ curl -sS -w '%{http_code}\n' -u user:$USER_PASS -X PUT -d '
{
  "allowlist": [
    "192.168.1.0/24",
    "192.168.10.0/24"
  ]
}' http://$API_FQDN/api/ip_allowlist