Managing projects - Project Console#
A project is a mechanism for managing access to measurements and other data. Measurements created in intdash always belong to one of the projects. Only users belonging to a project have access to the measurement data within that project.
See Project and Global Project for the concept of a project.
Accessing projects#
To use data in a specific project, launch a web application such as Data Visualizer from the Project Console.
Open the Project Console
<base-url>/project-console/.In the project list, click [Details] for the project you wish to use.
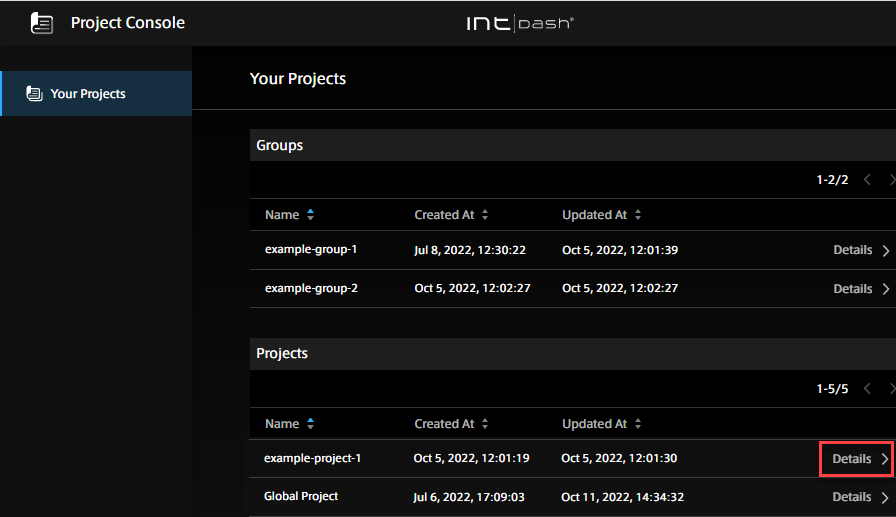
Fig. 16 Select a project#
The project details screen will appear.
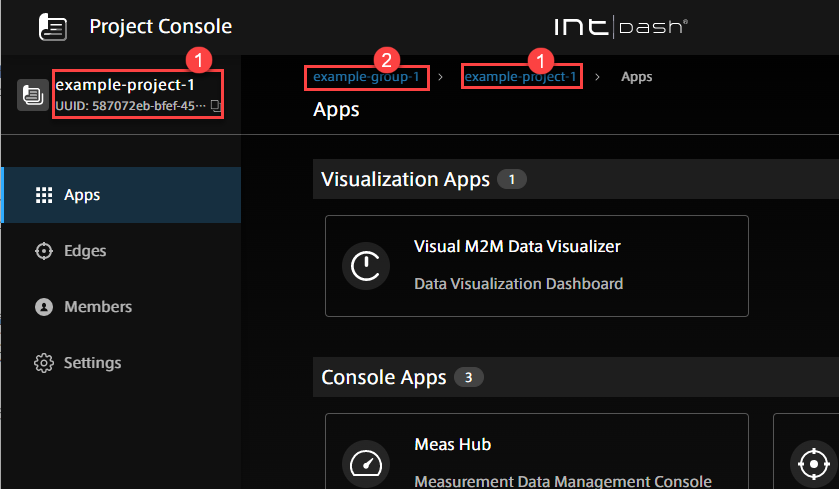
Fig. 17 Project details#
 Current project
 Group to which the project belongs (displayed only if you have access to the group)
Click the application button.
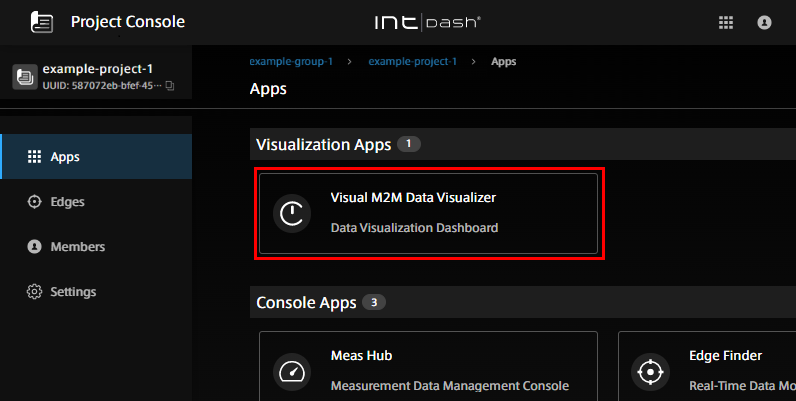
Fig. 18 Open the application in the project (In this example, Data Visualizer is selected.)#
Create a project#
If you want to create a new project, use the Project Console and create a project in a group.
Note
A group is required to create a project. If you do not have a group to which you have access, ask your administrator to create one.
Only users with the admin role in a group can create projects.
There is a limit to the number of projects that can be created in an intdash group. If you wish to change this limit, you will need to change the settings on the server side. Please contact us for details.
Open the Project Console
<base-url>/project-console/.From the list of groups, click on [Details] of the group to which you want the project to belong (in this case, example-group-1).
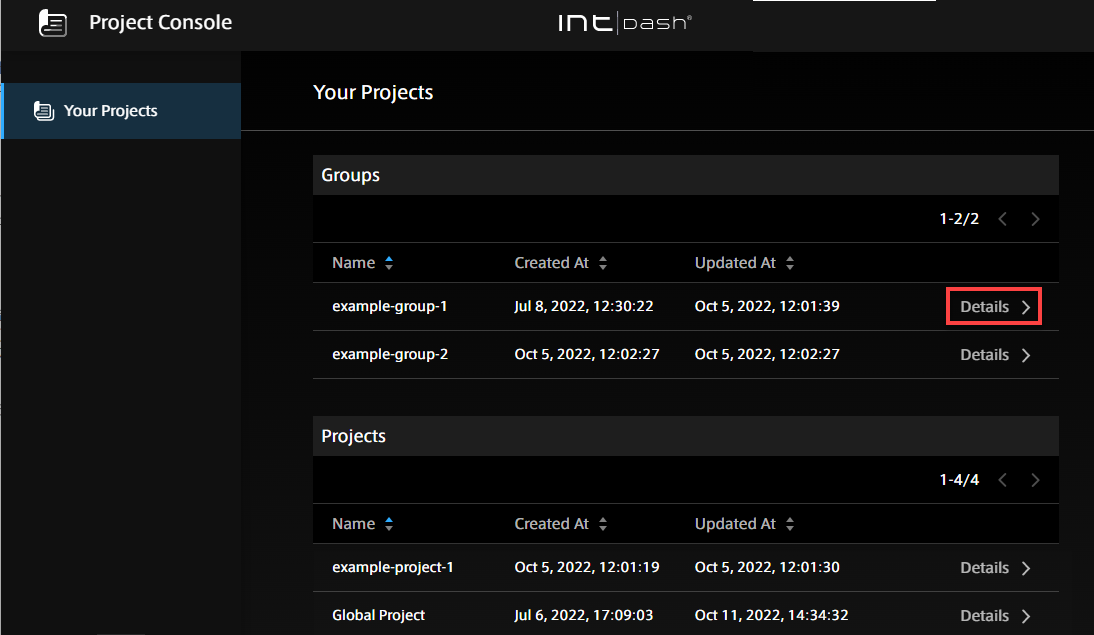
Fig. 19 Select a group#
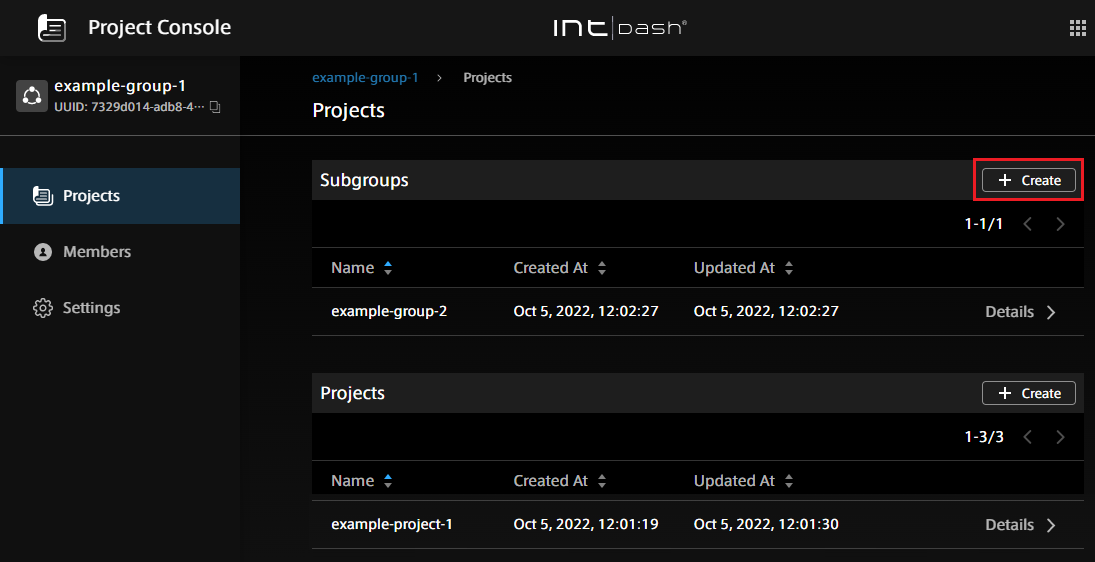
Click [+Create] in the list of projects.

Fig. 20 Create a project#
Enter a project name and click [Create].
A project is created in the group. Roles set in the group (example-group-1) are inherited by the newly created project, so users belonging to the group can use the new project.
The user who created the project becomes the owner of this project. The owner is granted all roles in this project.
Add/remove project members#
Note
This operation is available only to users with the admin role in the project.
Open the Project Console
<base-url>/project-console/.From the list of groups, click [Details] of the project for which you want to add/remove members.
Fig. 21 Select a project#
Click [Members].
A list of members belonging to the project is displayed. Members inherited from the parent group are displayed as "Inherited Member"s.
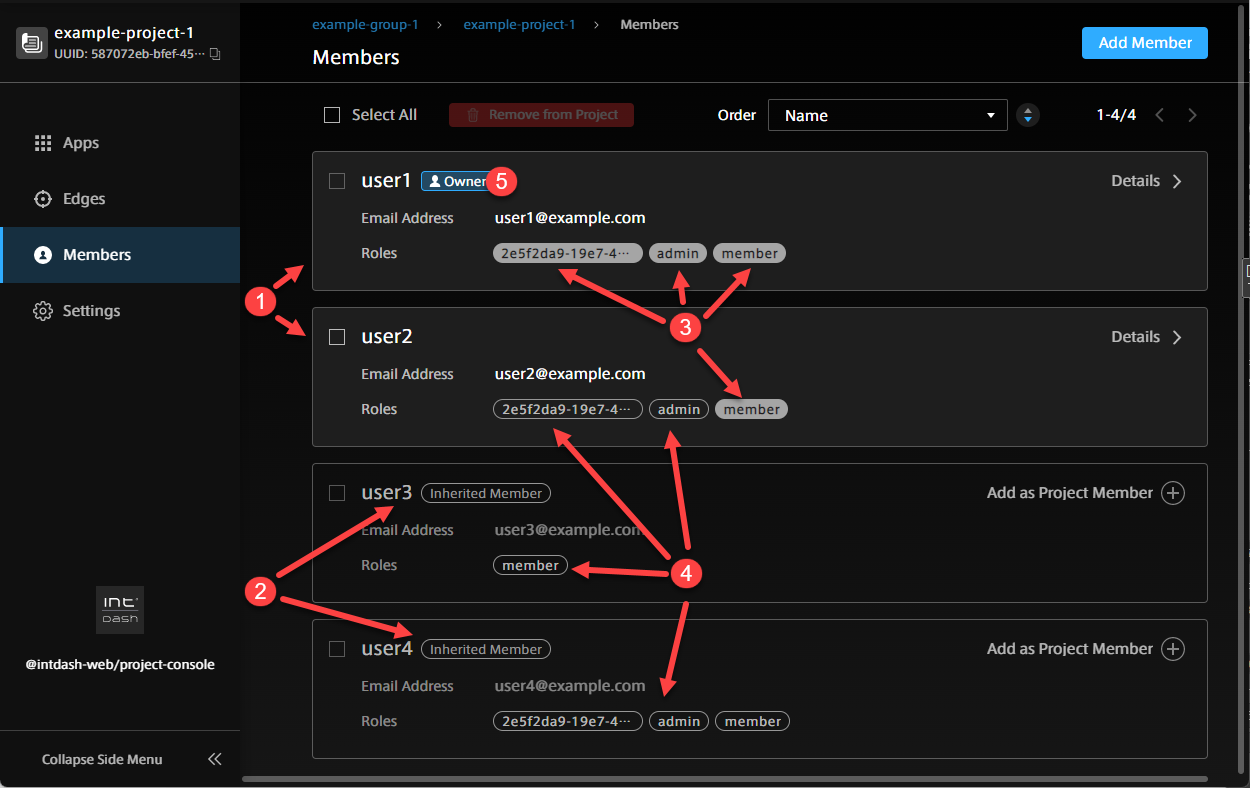
Fig. 22 View project members#
Members added directly in the project Members inherited from the parent group of the project Roles set directly in the project
 Roles inherited from the project's parent group
 Project owner
To add a member to the project:
If you want members inherited from the group to be direct members of the project, click [Add as Project Member].
To add other users, click [Add Member] and specify a user by his/her UUID or email address. The user's UUID can be found in the Admin Console. Or, if the user is a member of another project, the UUID can be found in the member details screen of the project.
Select the roles you wish to assign to the user in this project and click [Add]. Multiple roles can be assigned. (The available roles depend on the intdash domain.)
Click [Add].
To remove a member from the project:
Select a member and click [Remove from Project].
Roles set directly in this project will be deleted. Roles inherited from groups cannot be deleted.
Note
Owners cannot be removed from the project. If you want to remove a user who is the owner of a project, you must first make the user a non-owner ( Add/remove owners ) and then remove the user from the project.
Add/remove project edges#
Edges that send and receive data in a project must have access rights to that project.
Note
Edges should be created in My Page or Admin Console in advance.
Edge access rights must be set directly in the project. User access rights are inherited from the group to the project, but edge access rights cannot be set in a group.
Note
If you have the admin or member role in the project, you can:
Add edges that you own.
Change the name of the edge in the project (it does not matter if the edge is owned by you or not).
Remove the edges from the project (it does not matter if you own the edges or not).
If you have the admin role for the project, you can:
Add edges that you do not own.
Open the Project Console (
<base-url>/project-console/).From the list of projects, click on [Details] of the project for which you want to add/remove edges.
Fig. 23 Select a project#
Click [Edges].
A list of edges with access to the project is displayed.
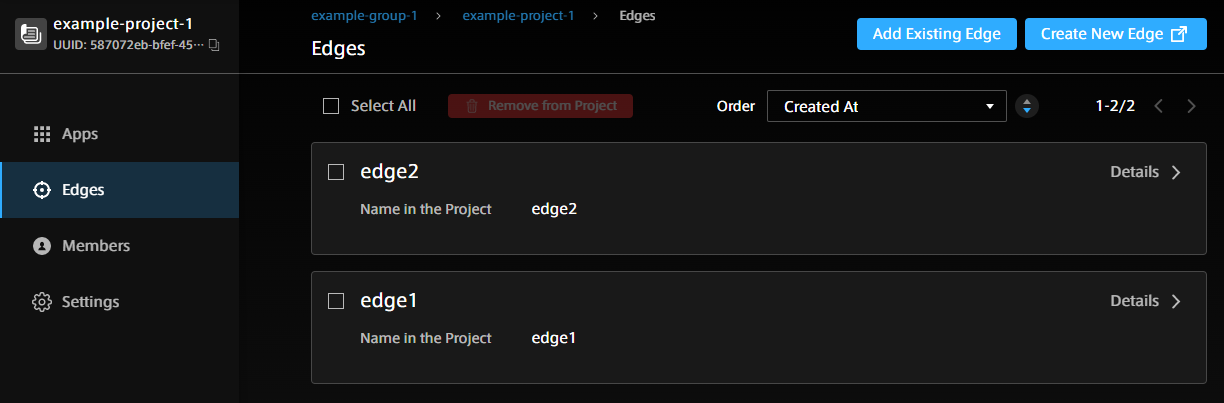
Fig. 24 Edges with access to the project#
To add an edge to your project:
Click [Add Existing Edge].
Enter the name of the edge you want to add.
Select an edge from the list of edges you own. Or, to add an edge that you do not own, enter the name of the edge.
In [Name in Project], enter the name you want to use to refer to this edge in the project (can be the same name entered in the previous step) and click [Add].
In each project, edges will appear with the name set in [Name in Project.] The name in project must be unique within the project.
To remove the edge from the project:
Select the edge and click [Remove from Project].
Change the project name#
Note
This operation is available only to users with the admin role in the project.
Open the Project Console
<base-url>/project-console/.From the list of projects, click [Details] for the project you wish to rename.
Fig. 25 Select a project#
Click [Settings].
Enter a project name and click [Save Changes].
Delete a project#
Warning
Deleting a project deletes all data (measurement data) in that project.
Note
This operation is available only to the project owner.
Open the Project Console
<base-url>/project-console/.From the list of projects, click [Details] for the project you want to delete.
Fig. 26 Select a project#
Click [Settings].
Click [Delete Project].
Create a group#
The Project Console allows you to create new groups within existing groups.
Note
This operation is only available to users with the admin role in the group to which the new group will belong.
There is a limit to the number of groups in an intdash domain. To change this limit, you will need to change the server-side settings. Please contact us for more information.
Groups can only be created within a group, so if no groups exist, no groups can be created. If you want to create a group at the top level and not within a group, only users with the admin role in the global context can do so. See Create a top-level group (For administrators).
Open the Project Console
<base-url>/project-console/.From the list of groups, click on [Details] of the group to which you want the group to belong (in this case, example-group-1).
Fig. 27 Select a group#
In the list of subgroups, click [+Create].
Enter a name for the new group and click [Create].
A group is created. Roles set in the parent group (example-group-1) are inherited by the new subgroup. The user who created the group becomes the owner of this group. The owner of the group will be granted all roles.
Add/remove group members#
Adding a member to a group gives that member access to the projects in the group.
Note
This operation is only available to users with the admin role in the group.
Open the Project Console
<base-url>/project-console/.From the list of groups, click [Details] of the group to which you want to add a member or from which you want to delete a member.
Fig. 28 Select a group#
Click [Members].
A list of members belonging to the group is displayed. Members inherited from the parent group are displayed as inherited members.
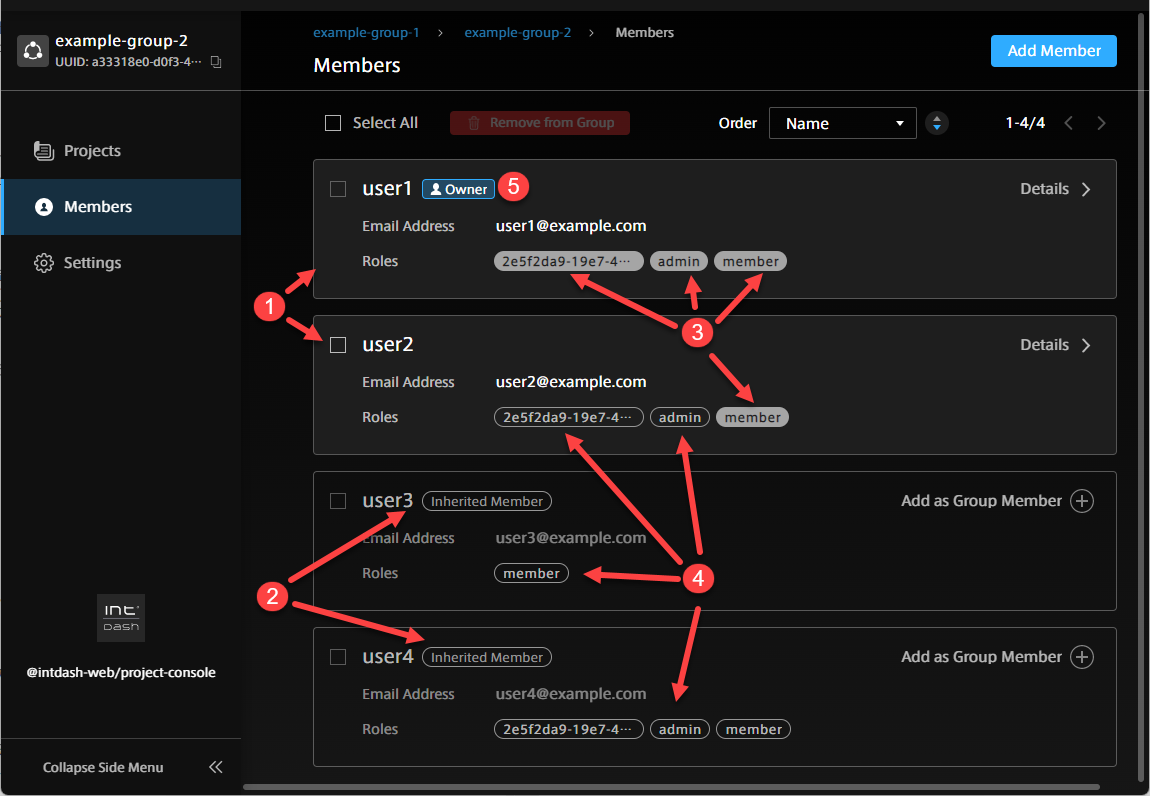
Fig. 29 Group member display#
Members directly added to the group Members inherited from the parent group Roles set directly in the group Roles inherited from the parent group Group owner
To add a member to the group:
Click [Add Member].
Specify a user by user's UUID or email address.
The user's UUID can be found in the Admin Console. If the user is a member of another project, the UUID can be found in the member details screen of the project.
Select the roles you want to assign to the user in this group and click [Add]. Multiple roles can be assigned. (The roles that can be added depend on the intdash domain.)
Click [Add].
To remove a member from a group.
Select a member and click [Remove from Project].
Roles set directly in this project will be deleted. Roles inherited from the parent group cannot be deleted.
Note
It is not possible to remove an owner from a group. If you want to remove a user who is the owner of a group, you must first make the user a non-owner ( Add/remove owners ) and then remove the user from the group.
Add/remove owners#
In a newly created project or group, the person who created the new project or group becomes the owner. Other users can be added as owners, and owners can be deleted if there are multiple owners.
Note
Only the project/group owner can perform this operation.
Open the Project Console
<base-url>/project-console/.Click [Details] for the project or group for which you want to add/remove owners.
Click [Members].
To add an owner:
Note
Inherited members cannot be made owners. If you want to make an inherited member an owner, you must add it as a direct member of that project/group.
Go to the details of the user you want to make the owner, and click [Add to Group Owners]/[Add to Project Owners].
The owner will be given all roles.
To remove the owner:
Go to the details of the user and click [Remove from Group Owners]/[Remove from Project Owners]. (A project or group must have at least one owner, so if there is only one owner, he/she cannot be removed.)
Change the group name#
Note
This operation is only available to users with the admin role in the group.
Open the Project Console
<base-url>/project-console/.From the list of groups, click [Details] for the group you want to rename.
Fig. 30 Select a group#
Click [Settings].
Enter a group name and click [Save Changes].
Delete a group#
Note
This operation is available only to the owners of the group.
Warning
Deleting a group deletes all data for all subordinate groups and projects belonging to that group.
Open the Project Console
<base-url>/project-console/.From the list of groups, click [Details] for the group you want to delete.
Fig. 31 Select a group#
Click [Settings].
Click [Delete Group].