11. Playback past data#
11.1. Types of past data#
There are three types of Stored Data.
- Measurements
Data from the start to end of measurement
- Markers
Markers added to measurements
- Captures
Data cut out from a measurement by specifying a time range as necessary. For details, see Creating a capture (record within a specified time frame).
11.1.1. Measurements#
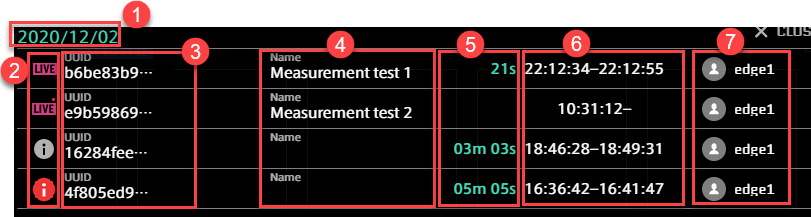
 Measurement date
 Measurement status
 Live measurement in progress
 Live measurement in progress (with missing data)
 Measurement completed
 Measurement completed (with missing data)
 Measurement UUID
 Measurement name
 Measurement length
 Start time and end time
 Name of the edge that created this measurement
11.1.2. Markers#
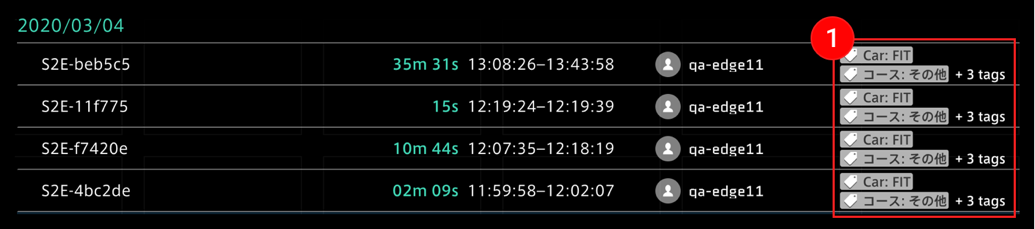
Markers that have been given to measurements with other applications are displayed. If there are tags with key-value pairs, they will also be displayed .
11.1.3. Captures#
When you mouse over the data item, the [Edit] button and [Delete] button appear. For details about how to create a capture, refer to Creating a capture (record within a specified time frame).

11.2. Replaying past data#
Select [Stored Data] from the content menu.

Select Measurements, Markers, or Captures. Past measurements are displayed in chronological order.
Select the measurement you want to display.

Note
Captures list
The Captures list shows the captures you (your user account) have created, and all captures created by edge accounts. Captures created by other user accounts are not displayed.
Note
Large measurement data may not be loaded
If the measurement data is too large to be loaded, do one of the following to reduce the size of the data to be loaded.
 Use the Preview Stored Data function to shorten the time range to be loaded.
Reduce data bindings to screens; Data Visualizer will attempt to load all data (whose Edge, Data Type, Data ID, and Channel match the settings) bound on the screens. Check for all loaded screens, not just the one currently visible.
11.3. Searching for past data#
11.3.1. Searching by period#
Click the date area to set the period. There are three ways to set the period, as follows.
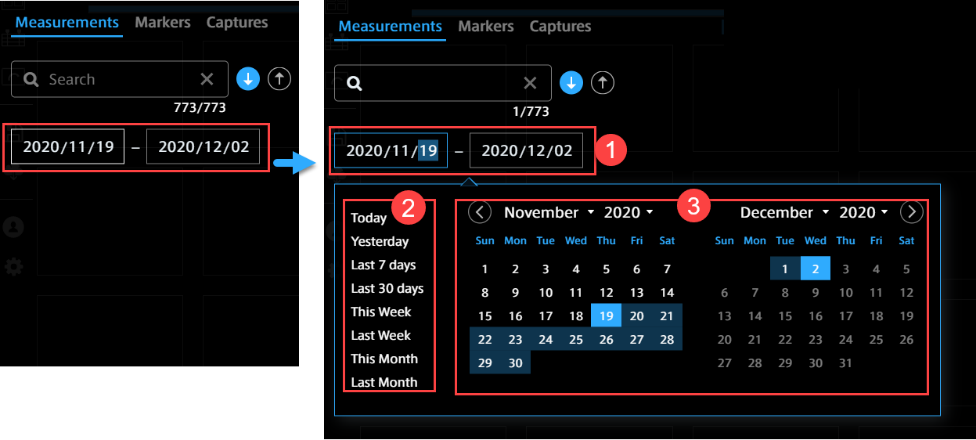
Enter the dates with keyboard.
Select a preset period. You can select a value such as "Today", "Yesterday", "Last 7 days", and "Last week", from the menu on the left.
Select the dates on the calendar.
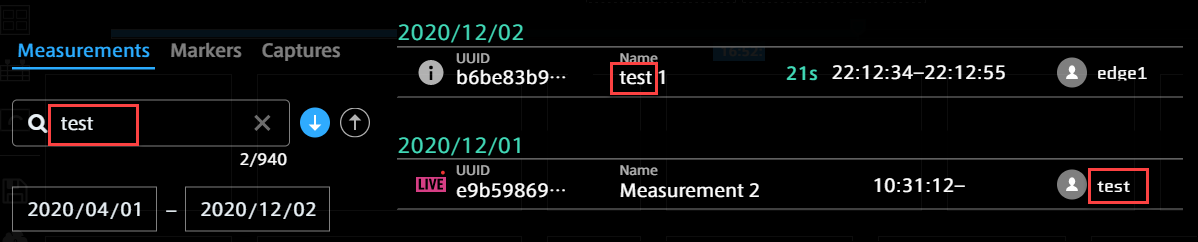
11.3.2. Searching in the list#
In the Measurements list, you can search by measurement UUID, measurement name or edge name.
In the Markers list, you can search by marker name, edge name, or tag value.
In the Captures list, you can search by the name of a capture.
11.4. Specifying the playback time range#
You can replay the measurement data by specifying an arbitrary time range. Click ![]() (Preview Stored Data) on the timeline control.
(Preview Stored Data) on the timeline control.
Absolute mode and Quick mode are provided to specify a period of past data.
11.4.1. Absolute mode#
This mode is based on the start time.
In the [Preview Stored Data] window, enter the start date and time and the playback period you want to display.
Click [OK]. After the data is loaded, the data is played from the specified start time
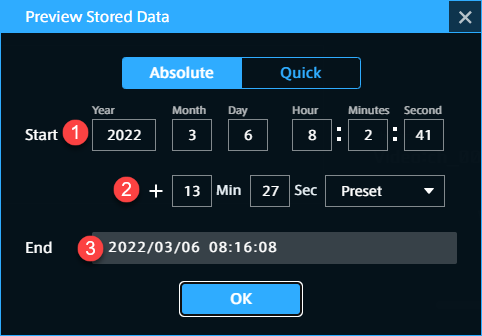
[Start] Enter a specific start time (seconds can also be set)
[+Min, Sec] Enter the length of the playback time of the data. (For details, see Point below.)
[End] End time of the data playback (optional). The calculation result from and is displayed.
Note
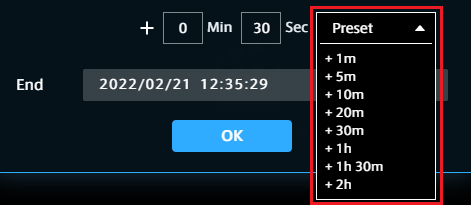
How to enter the playback period
There are three ways to enter the playback period.
Method 1: Directly enter numbers in the [Min] and [Sec] boxes.
Method 2: Mouse over the [Min] or [Sec] box, and then click the displayed arrows. The time can be set in minutes/seconds.
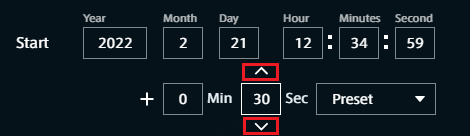
Method 3: Click [Preset], and then select a preset from the base time provided by the system.
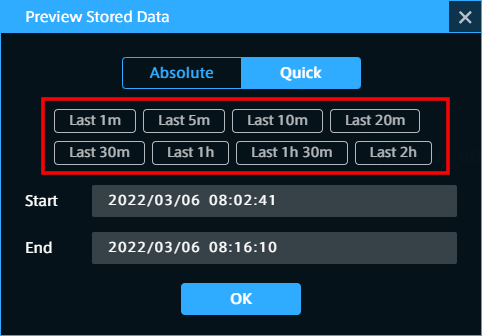
11.4.2. Quick mode#
This specification method is based on the current time. You can set the period from 1 minute to 1 hour before the current time.
Select [Last XX], and then click the [OK] button.
11.5. Creating a capture (record within a specified time frame)#
You can specify the data start time and end time, and then register them as a capture in Stored Data. There are two ways to specify the time.
11.5.1. Method 1: Directly entering the time#
Click
 (Create a Capture) on the timeline control.

Enter the start/end date and time of the data you want to register as a capture and the capture name, and then click [OK].
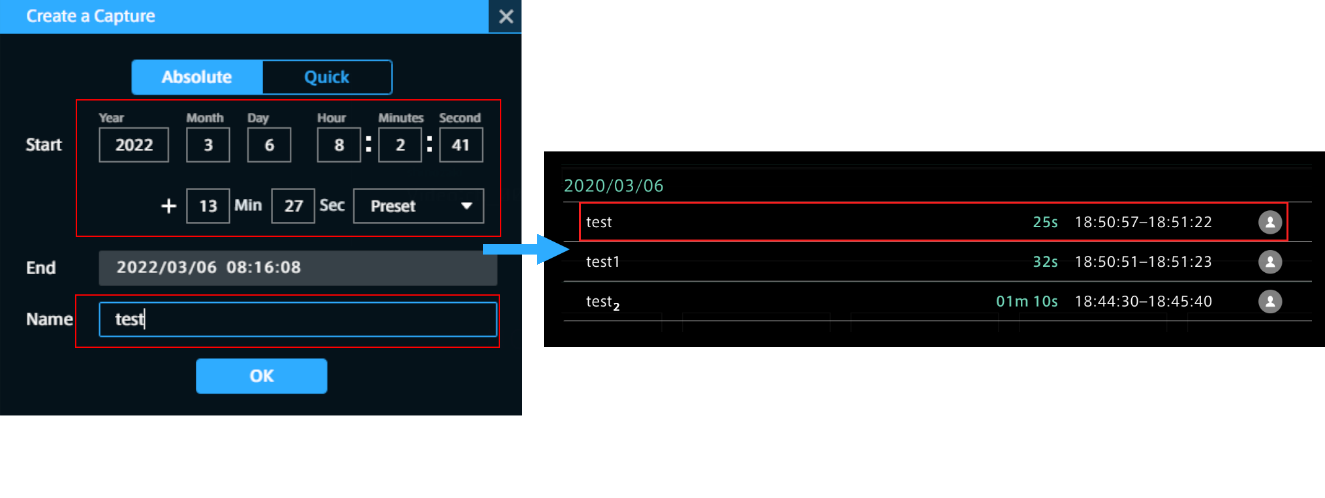
When you select the registered capture, data playback is started.
11.5.2. Method 2: Specifying the time on the timeline#
You can specify an arbitrary period within the measurement on the timeline.
Click the start time and drag it to the end time. The area in light green means the specified period.
Adjust the specified period and click
.
Enter the capture name in the displayed [Create a Capture] window and click [OK].
Note
Adjusting the specified period on the timeline
Adjustment of the start time and end time
Fine-tune the time frame by dragging the green cursor and click the [Create a Capture] button.

Adjustment without changing the length of the specified period
Drag the light green area between the cursors to move it to the left or right. You can adjust the start time and end time while keeping the length of the specified period.

Note
Captures list
The Captures list shows the captures you (your user account) have created, and all captures created by edge accounts. Captures created by other user accounts are not displayed.