7. Data Settings#
To display measurement data in Data Visualizer, data settings are required.
In intdash, measurement data is handled as binary data. Therefore, binary data must be parsed according to the data type and converted to physical values correctly. The settings for this parsing and conversion are called Data Settings.
Settings for CAN data can be created by importing a DBC file.
Settings for General Sensor, NMEA, Video, Audio, etc. can be downloaded as settings files (DAT files in Data Visualizer's own format) from within the Data Visualizer application. You need to import this DAT file.
It is also possible to create a new configuration and set the details in a dialog window.
Note
Data settings are stored in the web browser, not on the server.
Data Visualizer data settings are saved in the web browser of the PC, not on the server, so data settings created on other PCs will not be displayed. If you want to migrate the data settings to another PC, export the data settings as a DAT file and then import it at the destination.
7.1. List of data settings#
Click  (Data Settings) to display the list of data settings currently registered in the Data Visualizer.
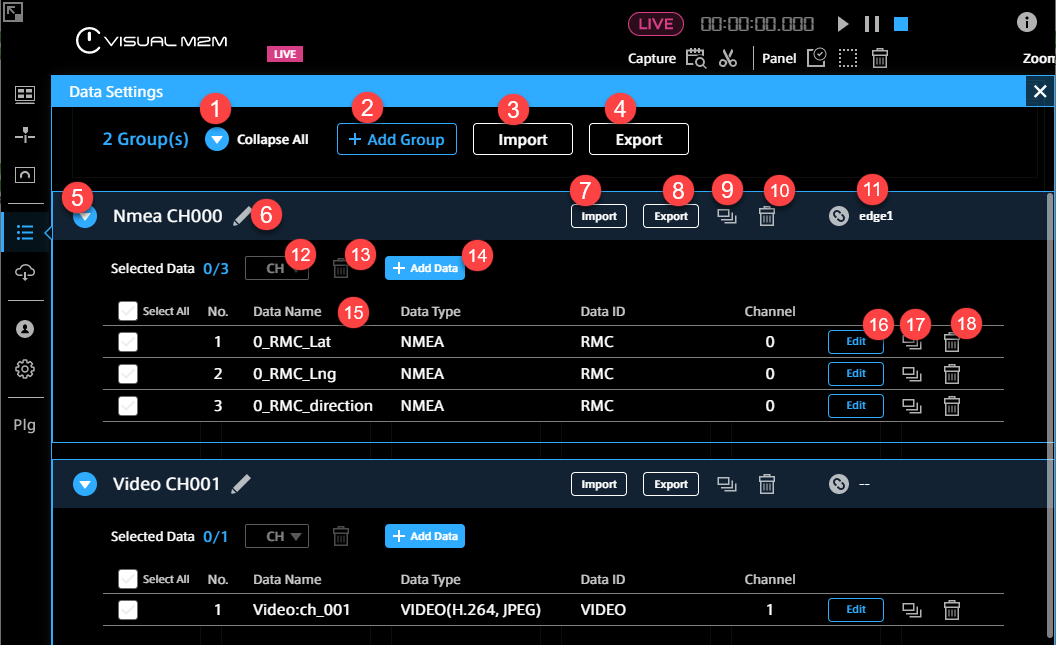
 Expand All/Collapse All
Expands/collapses all groups.
 Add Group
Adds a group of data settings.
 Import (all)
Imports a DBC file or DAT file to create data settings. See Create Settings for CAN Data by Importing a DBC File and Importing a DAT file.
 Export (all)
Exports the settings of all groups as a single DAT file.
 Expand / Collapse
Expands or collapses a group.
 Group Name
The name of the group. You can edit it by clicking
 (Edit).
 Import (Group)
Imports a DBC file or DAT file and adds settings to the group, see Create Settings for CAN Data by Importing a DBC File and Importing a DAT file.
 Export (Group)
Exports the settings in a group as a single DAT file.
 Duplicate (Group)
Duplicates a group and the data settings within it.
 Delete (Group)
Deletes a group and its data settings.
 Associate with Edge
Associates this group with a specific edge. The association will allow you to narrow down the data by selecting an edge in the Panel Settings screen.
 CH
CHChanges the channel for the selected data. You can change the channel here at once without opening the edit screen for each data setting.
 Delete (selected item)
Deletes the selected data setting.
 Add Data
Create a new data setting and add it to this group. For details on the setting method, refer to Create/edit new data settings.
 Data Name, Data Type, Data ID, and Channel
Displays some fields in data settings.
 Edit
EditEdit the data setting. For details, refer to Create/edit new data settings.
 Duplicate (1 item)
Duplicates a data setting.
 Delete (1 item)
Deletes a data setting.
Note
DAT files created with Data Visualizer prior to version 3.2
When importing a DAT file created with Data Visualizer prior to version 3.2, the Data Type field may display a different data type than intended because the data type information is not included in the file. In this case, click [Edit] to change the settings. Even if the Data Type field displays a different data type than intended, it will not affect the data visualization.
7.2. Create Settings for CAN Data by Importing a DBC File#
You can create data settings by importing a data definition file (DBC file) for CAN data.
Click [Import] at the top of the Data Settings screen and select the DBC file.
Note
Text encoding of DBC Files
The DBC file import function supports two types of text encoding, UTF-8 and Shift_JIS. The encoding is automatically detected. If the imported file contains code points that are not used by Shift_JIS, it will be imported as UTF-8.
Attention
Data Visualizer does not support Multiplexing (Multiplex message) of CAN.
7.3. Importing a DAT file#
You can import data settings exported from Data Visualizer on another PC, or data settings created in the past.
Click [Import] at the top of the Data Settings screen and select a DAT file.
Note
Settings for General Sensor, NMEA, Video, Audio, etc.
Settings for General Sensor, NMEA, Video, Audio and other data can be downloaded from the Data Visualizer application's [Config] > [Download DAT File]. By importing these files, you can easily create settings.
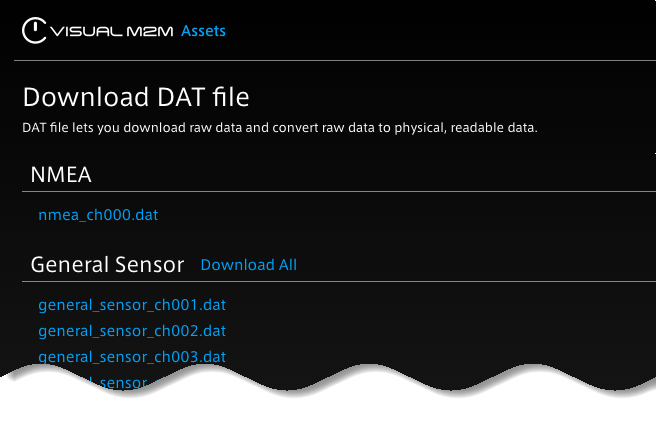
A number such as "ch001" in the DAT file name indicates the channel (ch001 is the settings file for channel 1).
7.4. Create/edit new data settings#
Click [Add Data] or [Edit] in the Data Settings list. The setting items are as follows.

- Data Name
The name of the data.
When the Data Type is “CANopen” and the Conversion Type is “As CANopen”, specify the first 4 bytes of the payload of the CAN data to be displayed using 8 uppercase hexadecimal characters (e.g., ABCDEF01). Only the CANopen data whose first 4 bytes of the payload match the specified value will be displayed.
- Display Name
You can add another name for display. The name you set here will be used as the initial value for the Panel Name.
- Target Data
Specify the data you want to display by using Data Type, Data ID, and Channel. For details, refer to Specifying the data to be displayed (Target Data).
- Description
Set an optional description.
- Conversion Settings
Set the conversion method to physical values, the choices displayed will differ depending on the Data Type of the Target Data. For more information, see Setting the data conversion method (Conversion Settings) .
- Display Settings
Set how the values will be displayed. Depending on the Conversion Type, different options are displayed. For more information, see Setting the display format (Display Settings).
Note
Parsing string data in CSV or JSON format
To parse CSV or JSON data sent to the intdash server as a string, select "String" in Data Type, and then select "As CSV" or "As JSON" in Conversion Settings. For more details, refer to Setting the data conversion method (Conversion Settings).
7.4.1. Specifying the data to be displayed (Target Data)#
Specify the data to be displayed by specifying the Data Type, Data ID, and Channel. Basically, Data Type, Data ID, and Channel should be the same as the settings on the sending edge. However, there are some exceptions. For details, refer to the following.
7.4.1.1. Data Type#
Data Type is the data type in iSCP (intdash Stream Control Protocol). Specify the same data type as specified on the sending edge. However, please note that the following cases require a different setting from the iSCP data type.
In the case of H.264 or JPEG, select VIDEO on Data Visualizer.
In the case of PCM or AAC, select AUDIO on Data Visualizer.
When handling CAN data as CANopen, select CANopen in Data Visualizer. If you use “As CANopen” as Conversion Type, specify the first 4 bytes of the payload of the CAN data in Data Name, using 8 uppercase hexadecimal characters (e.g., ABCDEF01).
7.4.1.2. Data ID#
Specify the ID set by the sender. For details, follow the table below.
Data Type |
How to specify the Data ID in Data Visualizer |
|---|---|
CAN |
Specify the CAN ID in decimal notation. |
CANopen |
Specify the CAN ID in decimal notation. |
NMEA |
Select the message type. Only RMC is supported in the current version. |
General Sensor |
Select the type of sensor. |
Control Pad |
Specify the value in hexadecimal notation with two uppercase letters. Only 01 is defined in the current version. |
MAVLink1 Packet |
Specify the ID in the format "<System ID (decimal notation)>_<Component ID (decimal notation)>_<Message ID (decimal notation)>". |
String |
Specify the ID as a string. |
Float |
Specify the ID as a string. |
Int |
Specify the ID as a string. |
Bytes |
Specify the ID as a string. |
Generic |
Specify the ID in hexadecimal notation, uppercase, 8 characters. |
VIDEO (H.264, JPEG) |
No need to specify. The data ID is fixed to "VIDEO". |
AUDIO (PCM, AAC) |
No need to specify. The data ID is fixed to "AUDIO". |
7.4.1.3. Channel#
Channel is a channel in iSCP. Specify the channel set at the sender edge.
7.4.2. Setting the data conversion method (Conversion Settings)#
In Conversion Type, set how the data should be converted and displayed. The available conversion types vary depending on the Data Type.
- No Conversion (As Binary)
Displays as binary (string in hexadecimal notation) without conversion.
Applicable data types: CAN, CANopen, Control Pad, MAVLink1 Packet, Bytes, Generic
- No Conversion (As Number)
Displays as a number without conversion.
Applicable data types: Float, Int
- No Conversion (As String)
Displays as a string without conversion.
Applicable data types: String
- No Conversion (As NMEA Sentence)
Displays NMEA sentences as strings without conversion.
Example: "$GPRMC,101020.500,A,3541.2763,N,13943.0267,E,000.0,000.0,010121,,,A*66"
Positioning System: When a positioning system is selected, only the data for that positioning system will be displayed. If you select [Auto], all the data will be displayed.
Applicable data types: NMEA
- As NMEA Field
Extracts the value of the specified field.
Positioning System: When a positioning system is selected, only the data for that positioning system will be displayed. If you select [Auto], all the data will be displayed.
Field Name: Specify the field for the NMEA data.
Applicable data types: NMEA
- As General Sensor
Extracts the value of the specified field.
Field Name: Specify a field in General Sensor data. The available fields differ depending on the Data ID.
Applicable data types: General Sensor
- As CSV
Parses string data as CSV (comma separated value) and extracts the value of the specified field.
Delimiter: Specify the delimiter character for CSV. Example: "," (comma) (up to 999 characters)
Index: Specify the element number (index is 0-based) of the field to be extracted.
Value Type: Select whether to treat the extracted value as a string or as a number.
Offset Factor (only for Number): This value will be added to the value extracted from the CSV. The Offset Factor is applied after the Scale Factor is applied.
Scale Factor(only for Number): The value extracted from the CSV will be multiplied by this value.
See also the example below this table for CSV data conversion settings.
Applicable data types: String
- As JSON
Parses string data as JSON and extracts the value of the specified field.
Field Path: Specify the path of the field to be extracted, using an object key or array index.
Value Type: Select whether to treat the extracted value as a string or as a number.
Offset Factor (only for Number): This value will be added to the value extracted from the JSON. The Offset Factor is applied after the Scale Factor is applied.
Scale Factor(only for Number): The value extracted from the CSV will be multiplied by this value.
See also the example below this table for JSON data conversion settings.
Applicable data types: String
- As Fixed Point Number (CAN Format)
Extracts a portion of the binary data and treats it as a fixed-point number.
Start Bit: Specify the start position (bit offset) of the part to be extracted from the binary data (integer value from 0 to 8191). The position will change depending on your choice of endianness.
Bit Length: Specify the bit length to be extracted from the binary data (integer value from 1 to 8192).
Offset Factor: This value will be added to the extracted value. The Offset Factor is applied after the Scale Factor is applied.
Scale Factor: The extracted value will be multiplied by this value.
Sign: Specify Signed or Unsigned.
Endian: Specify the endianness (Big Endian/Little Endian).
Applicable data types: CAN, Control Pad, MAVLink1 Packet, Bytes, Generic
- As CANopen
Same as “As Fixed Point Number (CAN Format)”.
Applicable data types: CANopen
- As Floating Point Number
Extracts a portion of binary data and treats it as a floating-point number.
Start Byte: Specify the start position (byte offset) of the part to be extracted from the binary data (integer value from 0 to 511).
Precision: Specify the bit length of the floating-point number (32bit/64bit).
Offset Factor: This value will be added to the extracted value. The Offset Factor is applied after the Scale Factor is applied.
Scale Factor: The extracted value will be multiplied by this value.
Endian: Little endian only.
Applicable data types: CAN, Control Pad, MAVLink1 Packet, Bytes, Generic
- As String
Extracts a part of the binary data and treats it as a string.
Start Byte: Specify the start position (byte offset) of the portion of binary data to be extracted as a character string (integer value from 0 to 511).
Byte Length: Specify the byte length to be extracted from the binary data (integer value from 1 to 512).
Applicable data types: CAN, Control Pad, MAVLink1 Packet, Bytes, Generic
Note
Example of CSV data conversion
As an example, consider the case where string data (Data Type: String) such as "1,2.34,5" is received and parsed as CSV.
Assume that the following data settings have been made:
Conversion Type: As CSV
Delimiter: , (comma)
Index: 1
Value Type: Number
Offset Factor: 1
Scale Factor: 10
In this case, the numeric value 2.34 in the comma-separated column with index 1 will be extracted. That number will be multiplied by Scale Factor 10, and then Offset Factor 1 will be added, resulting in the number 24.4.
Note
Example of JSON data conversion
As an example, consider the case where the following string data (Data Type is String) is received and parsed as JSON.
{
  "foo": [
    {"bar": 1.23}
  ]
}
Assume that the following data settings have been made:
Conversion Type: As JSON
Field Path: foo.0.bar
Value Type: Number
Offset Factor: 1
Scale Factor: 10
In this case, the value 1.23 is taken from the path "foo.0.bar". That value will be multiplied by Scale Factor 10, and then Offset Factor 1 will be added, resulting in a value of 13.3.
7.4.3. Setting the display format (Display Settings)#
Item |
Description |
|---|---|
Display Type |
Select whether to display the value as a string or as a number. |
Unit |
The unit to be displayed with the value. |
Range |
(Only when Display Type is set to Number) Specify the range of values to be displayed. This range will be the display range when displaying Meter or Line Graph (This can be changed in each panel). Negative infinity "-Infinity" and infinity "+Infinity" can also be set. |
No. of Digits after Decimal Point |
(Only when Display Type is set to Number) Specify the number of digits to be displayed after the decimal point (integer value from 0 to 9). |
Threshold (Lower/Upper) |
(Only when Display Type is set to Number) Specify the threshold value. If this threshold value is exceeded, a threshold error is displayed on the panel. |